Proper Engagement and Handling of 1.0 mm Connections
1.0 Proper Handling of 1.0 mm Interconnections
1.0 mm connectors require care, precision and that proper methodology be utilized when making interconnections between cables, adapters and equipment. These connectors are high-precision mechanical devices that are consequently susceptible to damage with the slightest mishandling. Following the guidelines and requirements for cleaning, aligning, threading, and torqueing 1.0 mm connectors is essential for equipment repeatability and longevity. The Mini-Circuits’ products covered by this application note include cables, adapters and other equipment, and following the guidelines below is strongly recommended.
1.1 Proper Cleaning of a 1.0 mm Connector
- Always perform any operation whatsoever at an ESD-safe workstation.
- Inspect and, if necessary, clean the connector surfaces.
- As shown in Figure 1, the connector on the left exhibits signs of dirt and debris.
- The connector must be cleaned with a foam swab (not a cotton swab) with a minimal amount of isopropyl alcohol (the swab need only be damp, so that the dirt and debris will stick to it).
- Too much alcohol can wick down inside the connector and create VSWR mismatch anomalies.
- If you suspect too much alcohol has been utilized, subject the connector to an elevated temperature soak appropriate for that item, for an extended period of time to evaporate the alcohol.

Figure 1: 1.0 mm connectors showing signs of debris (left), cleaning with a foam swab (center), and resulting clean connector (right).
1.2 The Art of the Interconnect – Steps to Safely and Precisely Engage 1.0 mm Connectors
- Carefully, axially align the connectors such that the male connector pin will slide precisely into the contact fingers of the female connector receptacle (see Figure 2, left).
- Treat every connector as though it were a calibration standard.

3. Once axially aligned, join the connectors by lightly pushing them straight together with a minimal amount of force.
4. While being held lightly in intimate contact, rotate the connector nut CCW slightly, until the very first thread engages as shown in Figure 2, center (note: when the first thread engages, the connector nut will ‘click-in-place’).

Figure 3: 1.0 mm adapter in axial alignment being threaded onto the cable connector improperly (left), and properly (right).
5. Using your fingers, gently tighten the connector nut with fingers, to no greater than half the required torque, or 2 in-lb. (0.45 N-m) (note: this is a very gentle amount of torque. Err on the side of too little and let the torque wrench do the rest).
- Never rotate, twist or spin the body of an adapter as shown in Figure 3 (left), always rotate the nut as shown in Figure 3 (right). Twisting or spinning 1.0 mm components when interconnecting them can inflict major damage on their center conductors.
- Always stabilize the body of an adapter or cable when turning a connector to make a connection (note: stabilizing mechanisms are not shown in Figure 3 for illustration purposes).
6. Continue to hold the hand-tight interconnection in axial alignment and utilize a calibrated torque wrench for final mating of the 1.0 mm connection (see Section 1.3).
1.3 Applying Final Torque Specifications – The Two-Wrench Method
- The maximum recommended torque specification for a 1.0 mm interconnection is 4 in-lb (0.45 N-m) and Mini-Circuits recommends using the maximum torque.
- Tightening connections should only be done by rotating the connector nut – never the cable nor the adapter body.

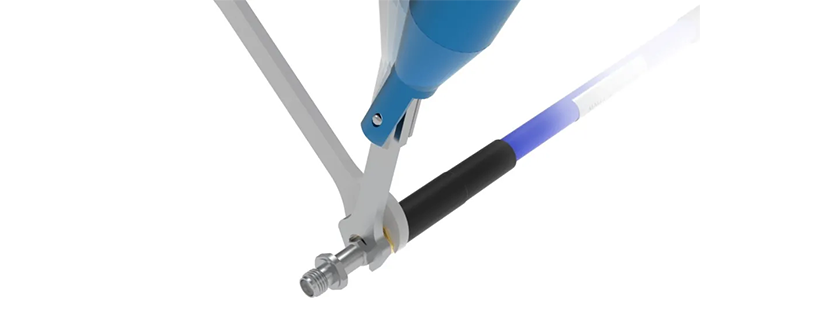
3. Torque wrench should be held gently at the groove located on the end of the handle as shown in Figure 4.
4. Apply force perpendicular to the handle (i.e. only rotationally).
- Do not ‘press’ the torque wrench towards the adapter, which will apply significant shear force to the interconnection.
- Instead, apply force perpendicular to the torque wrench handle, so that it pivots about the adapter axis, applying torque to the connection instead.
- Maintain the angle between the torque wrench and open-end wrench to less than 90⁰.

5. Once sufficient force is applied, the torque wrench will “break-over” at the point where the handle narrows into the wrench arm.
- Tighten the connection only until the handle has just broken over by approximately 15⁰ as shown in Figure 5.
- Going beyond this point, or fully breaking the torque wrench over at more significant angles may over-torque the connection, placing undue stress on the interconnected union, and even cause damage to the 1.0 mm connectors.
Courtesy of Mini-Circuits
Mini-Circuits
13 Neptune Avenue
Brooklyn, NY 11235
Phone: +1-718-934-4500
Email: sales@minicircuits.com
Web: www.minicircuits.com


